
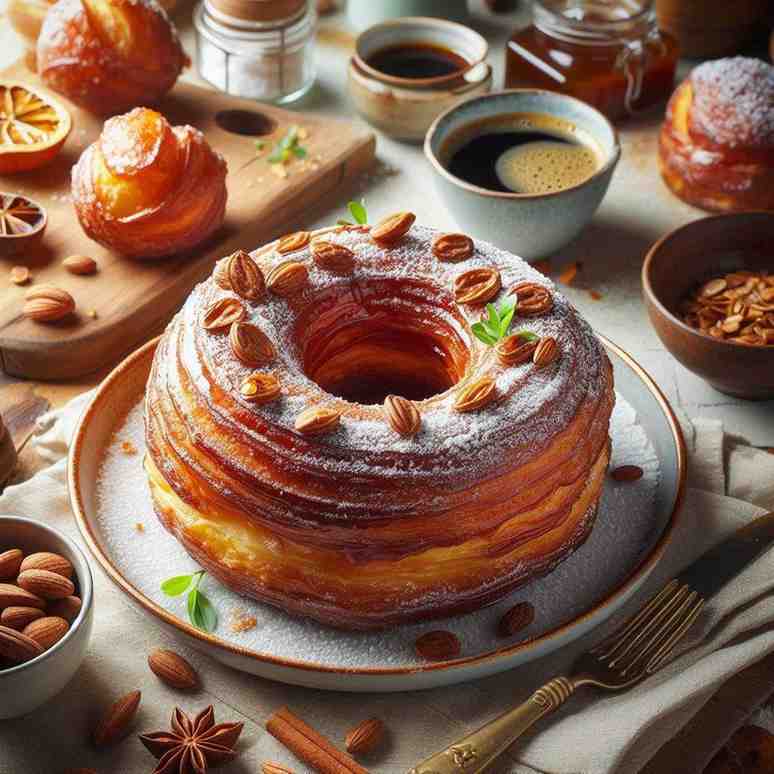
The Cronut Recipe is a popular pastry made with croissant dough and deep-fried like a doughnut. To make a Cronut, you need to layer croissant dough with butter, cut it into rings, and fry them until they are golden brown.
Then, dust them with sugar and fill them with cream or jam. The pastry was invented by Dominique Ansel in New York City and has since become a worldwide sensation. It’s a perfect combination of croissant flakiness and doughnut sweetness, making it a delicious treat for any time of day.
We will discuss the Cronut Recipe in detail and provide step-by-step instructions on how to make this delectable pastry at home.
Cronut Recipe Secrets
The Rise Of The Cronut
From its humble beginnings in a small New York City bakery to becoming a global phenomenon, the cronut has taken the world by storm. This delectable pastry, a fusion of a croissant and a donut, has captivated food enthusiasts and dessert lovers alike. Let’s delve into the fascinating rise of the cronut and uncover the story behind its meteoric ascent to culinary stardom.
Origin Story: From Concept To Craze
The cronut was first created by renowned pastry chef Dominique Ansel in 2013 at his eponymous bakery in New York City. Ansel’s innovative twist on the traditional croissant and donut quickly gained attention for its unique flavor and flaky texture. The concept of the cronut spread like wildfire, with enthusiasts lining up for hours to savor this delectable treat. The viral craze surrounding the cronut sparked a wave of culinary creativity, inspiring pastry chefs around the world to experiment with their own hybrid desserts.
Popularity Surge And Global Impact
The popularity of the cronut surged rapidly, transcending geographical boundaries and captivating the hearts and taste buds of people worldwide. Social media played a pivotal role in propelling the cronut to international fame, with tantalizing images and rave reviews contributing to its global allure. From London to Tokyo, bakeries and patisseries began offering their own versions of the cronut, further solidifying its status as a culinary sensation. Today, the cronut continues to leave an indelible mark on the global dessert scene, showcasing the enduring influence of culinary innovation and the power of a delectable, boundary-defying creation.
:max_bytes(150000):strip_icc()/diy-homemade-cronuts-1665107-hero-02-f5099074479342f1b56bfc521d5678f3.jpg)
Credit: www.thespruceeats.com
Essential Cronut Ingredients
When it comes to creating the perfect Cronut, it’s crucial to start with the essential ingredients. From the quality of the flour to the temperature of the butter, each component plays a pivotal role in achieving the delectable layers and flavors that make this pastry a standout treat.
Flour Power: Choosing The Right Type
Flour is the foundation of any good pastry, and the Cronut is no exception. The ideal choice is a high-quality, all-purpose flour that strikes the right balance between protein content and gluten development. This ensures a tender, flaky texture while providing enough structure to support the layers.
Butter Basics: Quality And Temperature
When it comes to butter, quality is non-negotiable. Opt for European-style butter with a high butterfat content for superior flavor and texture. Additionally, maintaining the proper temperature is crucial. The butter should be cold enough to create distinct layers during lamination, but not so cold that it becomes difficult to work with.
The Dough’s Delicate Layers
Discover the secret to creating the perfect cronut with delicate, flaky layers of dough. This cronut recipe will guide you through the process of making this delectable pastry at home, ensuring a delightful treat for any occasion.
Mastering Lamination Techniques
When it comes to creating the perfect cronut, mastering the lamination technique is crucial. Lamination refers to the process of creating multiple layers of butter within the dough, resulting in a flaky and delicate pastry. This technique requires precision and patience, but the end result is well worth the effort.
To achieve the desired layers in your cronut dough, it is important to follow a few key steps. First, make sure that your butter is at the right temperature. It should be cool and pliable, but not too soft. This will allow for easy incorporation into the dough without melting or breaking.
Next, roll out the dough into a rectangle shape, ensuring it is of even thickness. Place the butter in the center of the dough and fold the edges over to encase it completely. This creates a “butter packet” that will be rolled out and folded multiple times to create the layers.
Resting And Folding: Timing Is Key
Resting and folding the dough at the right intervals is crucial to achieving those delicate layers. After each roll and fold, it is important to give the dough time to relax and chill in the refrigerator. This allows the gluten to relax and prevents the butter from melting.
Timing is key when it comes to resting and folding the dough. Too little time and the layers won’t develop properly, resulting in a dense cronut. Too much time and the butter may start to melt, compromising the flakiness. It is recommended to rest the dough for about 30 minutes to an hour between each fold.
During the resting period, the dough should be wrapped tightly in plastic wrap to prevent drying out. Once the resting time is up, gently roll out the dough again and repeat the folding process. This will continue to build the layers and create that desired flaky texture.
By mastering the lamination technique and understanding the importance of resting and folding, you can achieve those coveted delicate layers in your homemade cronuts. These layers not only add visual appeal but also contribute to the mouthwatering texture and taste of this beloved pastry.

Credit: serenalissy.com
Frying Fundamentals
Frying is a crucial step in creating the perfect cronut, as it gives the pastry its signature golden brown color and irresistible crispiness. To achieve the best results, it’s important to understand the fundamentals of frying. In this section, we will discuss two key aspects: oil selection and temperature control.
Oil Selection
Choosing the right oil is essential for achieving a delicious cronut. Opt for oils with a high smoke point to prevent them from breaking down at high temperatures. Some excellent choices include vegetable oil, canola oil, or peanut oil. These oils are neutral in flavor, allowing the cronut’s delicate taste to shine through.
Temperature Control
Controlling the oil temperature is crucial for ensuring the perfect cronut texture. If the oil is too hot, the cronut may burn on the outside while remaining undercooked on the inside. On the other hand, if the oil is not hot enough, the cronut will absorb excess oil, resulting in a greasy final product.
To achieve the ideal frying temperature, use a deep-fry thermometer to monitor the oil closely. The recommended temperature for frying cronuts is around 350°F (175°C). Maintain this temperature throughout the frying process by adjusting the heat as needed.
Remember, consistency is key when it comes to frying cronuts. Keeping the oil at a steady temperature ensures that each cronut is evenly cooked, resulting in a beautifully golden brown exterior and a light, flaky interior.
Now that we have covered the frying fundamentals, let’s move on to the next step: achieving the perfect golden brown.
Secrets To A Fluffy Interior
Achieving a fluffy interior in your cronut recipe is all about the right technique. Whisking the dough gently and allowing it to rise properly will result in a light and airy texture. Additionally, using high-quality ingredients, such as fresh yeast and good-quality butter, can also contribute to the perfect fluffy interior.
Cronuts have taken the world by storm with their flaky, buttery exterior and a soft, fluffy interior. Achieving the perfect texture can be a challenge, but with a few simple secrets, you can make the perfect Cronuts in your kitchen. In this post, we’ll share our top tips for achieving a fluffy interior in your Cronuts.
Proofing Perfection
Proofing is a crucial step in the Cronut-making process. The dough needs to be proofed at the right temperature and for the right amount of time to achieve a light and airy texture. Proofing refers to the process of letting the dough rest and rise. It is important to let the dough rise until it has doubled in size. Over-proofing can lead to a collapsed and dense interior.
The Role Of Moisture And Heat
The right moisture and heat levels are crucial for achieving a fluffy interior in your Cronuts. The dough needs to be kept moist during the proofing process to prevent it from drying out. Covering the dough with a damp towel or plastic wrap can help to keep it moist.
The heat level is also crucial. If the temperature is too high, the dough will rise too quickly, resulting in a dense interior. If the temperature is too low, the dough will not rise enough, resulting in a heavy interior.
Recipe For Fluffy Cronuts
Here’s a recipe for fluffy Cronuts that incorporates the secrets mentioned above:
- Mix the dough and allow it to rise until it has doubled in size.
- Roll out the dough and cut it into circles.
- Allow the circles to rise again until they have doubled in size.
- Fry the Cronuts in oil at the right temperature until golden brown.
- Coat the Cronuts in sugar and enjoy!
Remember to keep the dough moist, proof it at the right temperature, and fry it at the right temperature to achieve a fluffy interior. Happy baking!
Signature Fillings And Glazes
When it comes to Cronuts, the signature fillings and glazes are what sets them apart from other pastries. Crafting creamy centers and top coats that are both sweet and shiny is key to creating the perfect Cronut recipe.
Crafting Creamy Centers
The creamy center of a Cronut is what makes each bite so deliciously indulgent. From classic flavors like vanilla and chocolate to more unique options like matcha and passionfruit, the possibilities for filling combinations are endless. To craft the perfect creamy center, it’s important to start with high-quality ingredients like fresh cream, eggs, and butter. Once the filling is made, it’s piped into the Cronut pastry and left to set, creating a deliciously decadent center.
Top Coats: Sweet And Shiny
The top coat of a Cronut is just as important as the filling, providing a sweet and shiny finish that’s sure to impress. Whether you prefer a classic glaze or something a bit more unique like a salted caramel drizzle, the top coat is where you can really get creative with your Cronut recipe. To make a shiny glaze, a mixture of powdered sugar, milk, and flavorings is cooked until thick and then poured over the top of the pastry. Other options for top coats include chocolate ganache, fruit compotes, and even whipped cream.
When it comes to creating the perfect Cronut recipe, the signature fillings and glazes are what take this pastry to the next level. By crafting creamy centers and top coats that are both sweet and shiny, you can create a Cronut that’s truly unforgettable.
Decorative Touches And Presentation
When it comes to creating a truly impressive dessert, the way it is presented can make all the difference. In this section, we will explore some creative ideas for adding decorative touches and elevating the presentation of your homemade cronuts. From garnishes to plating techniques, these tips will help you take your cronuts to the next level.
Elevating With Garnishes
One simple way to enhance the visual appeal of your cronuts is by adding garnishes. These small, decorative elements can add a pop of color, texture, and flavor to your final creation. Consider the following garnish ideas:
- Sprinkle a dusting of powdered sugar or cocoa powder on top of your cronuts for an elegant touch.
- Add a dollop of whipped cream or a scoop of ice cream alongside your cronuts for a creamy and indulgent twist.
- Drizzle a rich chocolate sauce or a fruity coulis over the cronuts for a decadent finishing touch.
- Top each cronut with fresh berries, sliced fruits, or edible flowers to create a visually stunning presentation.
Plating Techniques For Visual Appeal
Aside from garnishes, the way you plate your cronuts can also have a significant impact on their visual appeal. Consider these plating techniques to make your cronuts look more enticing:
- Place the cronuts on a bed of crushed cookies or chocolate crumbs to create a textural contrast.
- Arrange the cronuts in a circular pattern on a plate for an eye-catching presentation.
- Use a piping bag to create decorative patterns with sauces or creams around the plate.
- Pair your cronuts with complementary elements such as fresh fruits, nuts, or a drizzle of caramel sauce.
Remember, presentation plays a crucial role in the overall dining experience. By using these decorative touches and plating techniques, you can transform your cronuts into a visually stunning masterpiece that will impress your guests.
:max_bytes(150000):strip_icc()/6305432-25d248c4fea7401e940bb1f19fb147ee.jpg)
Credit: www.allrecipes.com
Troubleshooting Common Cronut Conundrums
Creating the perfect cronut can be a challenging endeavor, even for seasoned bakers. From avoiding soggy pastry pitfalls to fixing layer separation issues, it’s important to be equipped with the right knowledge to troubleshoot any cronut conundrums that may arise. In this section, we will explore some common problems that bakers encounter when making cronuts and provide simple yet effective solutions to ensure your cronuts turn out flawlessly every time.
Avoiding Soggy Pastry Pitfalls
Soggy cronuts can be a major disappointment, but fear not! By following these tips, you can avoid this common issue:
- Properly measure and mix your ingredients to ensure the dough has the right consistency. Remember, too much moisture can lead to sogginess.
- Allow the cronuts to cool completely on a wire rack before glazing or filling them. This will help prevent excess moisture from accumulating.
- Store your cronuts in an airtight container at room temperature to maintain their crispness. Avoid refrigerating them, as this can contribute to sogginess.
Layer Separation Issues And Fixes
One of the most common problems bakers face when making cronuts is layer separation. But worry not, as here are some solutions to help you overcome this challenge:
- Ensure that you properly laminate the dough by folding and rolling it multiple times. This creates distinct layers that are less likely to separate during baking.
- Chill the dough between each lamination step to keep the butter cold and prevent it from melting into the dough.
- Bake the cronuts at the correct temperature and for the recommended time. Underbaking can result in layer separation, so make sure to follow the recipe closely.
By following these troubleshooting tips, you’ll be well-equipped to overcome any common cronut conundrums that may come your way. With a little practice and attention to detail, you’ll soon master the art of creating delicious and visually stunning cronuts that will impress everyone who takes a bite.
Cronut Variations And Flavors
When it comes to the beloved cronut, the variations and flavors are as diverse as they are delightful. From classic combinations to innovative twists, the world of cronuts offers a tantalizing array of options to satisfy every palate. Whether you’re a fan of seasonal sensations or eager to try out unique renditions of the traditional recipe, there’s a cronut variation for every taste and occasion.
Seasonal Sensations
Embracing the essence of each season, cronut enthusiasts can indulge in a delectable array of seasonal sensations. From refreshing summer fruits to cozy autumn spices, these limited-time offerings bring a burst of seasonal flavors to the beloved pastry. Whether it’s a zesty lemon-infused cronut for summer or a warm, spiced apple creation for fall, these seasonal sensations add a touch of culinary excitement to the cronut experience.
Innovative Twists On The Classic Recipe
Pushing the boundaries of creativity, bakers and pastry chefs continue to dream up innovative twists on the classic cronut recipe. From unconventional fillings to unexpected toppings, these innovative renditions breathe new life into the beloved pastry. Whether it’s a savory-sweet fusion or a daring flavor combination, these innovative cronut variations never fail to surprise and delight adventurous food enthusiasts.
Frequently Asked Questions
Why Does It Take 3 Days To Make A Cronut?
The process of making a Cronut takes 3 days due to the intricate steps involved. The dough needs time to proof and chill, creating a light and flaky texture. The layers are formed through repeated rolling and folding, resulting in a unique pastry.
What Are Cronuts Made Of?
Cronuts are made of croissant dough that is deep-fried, then rolled in sugar and filled with flavored cream. The dough is layered with butter, creating a flaky texture that is similar to a croissant. The creation of the cronut is credited to a New York City pastry chef, Dominique Ansel, in 2013.
Is Cronut Dough The Same As Croissant?
No, Cronut dough is not the same as croissant dough. Cronut is a hybrid pastry made from laminated dough that’s fried, whereas croissants are baked. The dough for Cronut is also enriched with sugar and butter, which makes it different from croissant dough.
Is Cronut Made From Puff Pastry?
Yes, Cronut is made from puff pastry. It is a pastry that combines the flaky layers of a croissant with the shape and deep-fried texture of a doughnut.
Conclusion
This cronut recipe is a delightful treat that combines the best of a croissant and a donut. With its flaky layers and sweet glaze, it is sure to satisfy your cravings. By following these easy steps, you can create your own homemade cronuts that will impress your family and friends.
So why wait? Get in the kitchen and start baking these delicious cronuts today!
The Cronut Recipe is a popular pastry made with croissant dough and deep-fried like a doughnut. To make a Cronut, you need to layer croissant dough with butter, cut it into rings, and fry them until they are golden brown.
Then, dust them with sugar and fill them with cream or jam. The pastry was invented by Dominique Ansel in New York City and has since become a worldwide sensation. It’s a perfect combination of croissant flakiness and doughnut sweetness, making it a delicious treat for any time of day.
We will discuss the Cronut Recipe in detail and provide step-by-step instructions on how to make this delectable pastry at home.
Cronut Recipe Secrets
The Rise Of The Cronut
From its humble beginnings in a small New York City bakery to becoming a global phenomenon, the cronut has taken the world by storm. This delectable pastry, a fusion of a croissant and a donut, has captivated food enthusiasts and dessert lovers alike. Let’s delve into the fascinating rise of the cronut and uncover the story behind its meteoric ascent to culinary stardom.
Origin Story: From Concept To Craze
The cronut was first created by renowned pastry chef Dominique Ansel in 2013 at his eponymous bakery in New York City. Ansel’s innovative twist on the traditional croissant and donut quickly gained attention for its unique flavor and flaky texture. The concept of the cronut spread like wildfire, with enthusiasts lining up for hours to savor this delectable treat. The viral craze surrounding the cronut sparked a wave of culinary creativity, inspiring pastry chefs around the world to experiment with their own hybrid desserts.
Popularity Surge And Global Impact
The popularity of the cronut surged rapidly, transcending geographical boundaries and captivating the hearts and taste buds of people worldwide. Social media played a pivotal role in propelling the cronut to international fame, with tantalizing images and rave reviews contributing to its global allure. From London to Tokyo, bakeries and patisseries began offering their own versions of the cronut, further solidifying its status as a culinary sensation. Today, the cronut continues to leave an indelible mark on the global dessert scene, showcasing the enduring influence of culinary innovation and the power of a delectable, boundary-defying creation.
Credit: www.thespruceeats.com
Essential Cronut Ingredients
When it comes to creating the perfect Cronut, it’s crucial to start with the essential ingredients. From the quality of the flour to the temperature of the butter, each component plays a pivotal role in achieving the delectable layers and flavors that make this pastry a standout treat.
Flour Power: Choosing The Right Type
Flour is the foundation of any good pastry, and the Cronut is no exception. The ideal choice is a high-quality, all-purpose flour that strikes the right balance between protein content and gluten development. This ensures a tender, flaky texture while providing enough structure to support the layers.
Butter Basics: Quality And Temperature
When it comes to butter, quality is non-negotiable. Opt for European-style butter with a high butterfat content for superior flavor and texture. Additionally, maintaining the proper temperature is crucial. The butter should be cold enough to create distinct layers during lamination, but not so cold that it becomes difficult to work with.
The Dough’s Delicate Layers
Discover the secret to creating the perfect cronut with delicate, flaky layers of dough. This cronut recipe will guide you through the process of making this delectable pastry at home, ensuring a delightful treat for any occasion.
Mastering Lamination Techniques
When it comes to creating the perfect cronut, mastering the lamination technique is crucial. Lamination refers to the process of creating multiple layers of butter within the dough, resulting in a flaky and delicate pastry. This technique requires precision and patience, but the end result is well worth the effort.
To achieve the desired layers in your cronut dough, it is important to follow a few key steps. First, make sure that your butter is at the right temperature. It should be cool and pliable, but not too soft. This will allow for easy incorporation into the dough without melting or breaking.
Next, roll out the dough into a rectangle shape, ensuring it is of even thickness. Place the butter in the center of the dough and fold the edges over to encase it completely. This creates a “butter packet” that will be rolled out and folded multiple times to create the layers.
Resting And Folding: Timing Is Key
Resting and folding the dough at the right intervals is crucial to achieving those delicate layers. After each roll and fold, it is important to give the dough time to relax and chill in the refrigerator. This allows the gluten to relax and prevents the butter from melting.
Timing is key when it comes to resting and folding the dough. Too little time and the layers won’t develop properly, resulting in a dense cronut. Too much time and the butter may start to melt, compromising the flakiness. It is recommended to rest the dough for about 30 minutes to an hour between each fold.
During the resting period, the dough should be wrapped tightly in plastic wrap to prevent drying out. Once the resting time is up, gently roll out the dough again and repeat the folding process. This will continue to build the layers and create that desired flaky texture.
By mastering the lamination technique and understanding the importance of resting and folding, you can achieve those coveted delicate layers in your homemade cronuts. These layers not only add visual appeal but also contribute to the mouthwatering texture and taste of this beloved pastry.
Credit: serenalissy.com
Frying Fundamentals
Frying is a crucial step in creating the perfect cronut, as it gives the pastry its signature golden brown color and irresistible crispiness. To achieve the best results, it’s important to understand the fundamentals of frying. In this section, we will discuss two key aspects: oil selection and temperature control.
Oil Selection
Choosing the right oil is essential for achieving a delicious cronut. Opt for oils with a high smoke point to prevent them from breaking down at high temperatures. Some excellent choices include vegetable oil, canola oil, or peanut oil. These oils are neutral in flavor, allowing the cronut’s delicate taste to shine through.
Temperature Control
Controlling the oil temperature is crucial for ensuring the perfect cronut texture. If the oil is too hot, the cronut may burn on the outside while remaining undercooked on the inside. On the other hand, if the oil is not hot enough, the cronut will absorb excess oil, resulting in a greasy final product.
To achieve the ideal frying temperature, use a deep-fry thermometer to monitor the oil closely. The recommended temperature for frying cronuts is around 350°F (175°C). Maintain this temperature throughout the frying process by adjusting the heat as needed.
Remember, consistency is key when it comes to frying cronuts. Keeping the oil at a steady temperature ensures that each cronut is evenly cooked, resulting in a beautifully golden brown exterior and a light, flaky interior.
Now that we have covered the frying fundamentals, let’s move on to the next step: achieving the perfect golden brown.
Secrets To A Fluffy Interior
Achieving a fluffy interior in your cronut recipe is all about the right technique. Whisking the dough gently and allowing it to rise properly will result in a light and airy texture. Additionally, using high-quality ingredients, such as fresh yeast and good-quality butter, can also contribute to the perfect fluffy interior.
Cronuts have taken the world by storm with their flaky, buttery exterior and a soft, fluffy interior. Achieving the perfect texture can be a challenge, but with a few simple secrets, you can make the perfect Cronuts in your kitchen. In this post, we’ll share our top tips for achieving a fluffy interior in your Cronuts.
Proofing Perfection
Proofing is a crucial step in the Cronut-making process. The dough needs to be proofed at the right temperature and for the right amount of time to achieve a light and airy texture. Proofing refers to the process of letting the dough rest and rise. It is important to let the dough rise until it has doubled in size. Over-proofing can lead to a collapsed and dense interior.
The Role Of Moisture And Heat
The right moisture and heat levels are crucial for achieving a fluffy interior in your Cronuts. The dough needs to be kept moist during the proofing process to prevent it from drying out. Covering the dough with a damp towel or plastic wrap can help to keep it moist.
The heat level is also crucial. If the temperature is too high, the dough will rise too quickly, resulting in a dense interior. If the temperature is too low, the dough will not rise enough, resulting in a heavy interior.
Recipe For Fluffy Cronuts
Here’s a recipe for fluffy Cronuts that incorporates the secrets mentioned above:
- Mix the dough and allow it to rise until it has doubled in size.
- Roll out the dough and cut it into circles.
- Allow the circles to rise again until they have doubled in size.
- Fry the Cronuts in oil at the right temperature until golden brown.
- Coat the Cronuts in sugar and enjoy!
Remember to keep the dough moist, proof it at the right temperature, and fry it at the right temperature to achieve a fluffy interior. Happy baking!
Signature Fillings And Glazes
When it comes to Cronuts, the signature fillings and glazes are what sets them apart from other pastries. Crafting creamy centers and top coats that are both sweet and shiny is key to creating the perfect Cronut recipe.
Crafting Creamy Centers
The creamy center of a Cronut is what makes each bite so deliciously indulgent. From classic flavors like vanilla and chocolate to more unique options like matcha and passionfruit, the possibilities for filling combinations are endless. To craft the perfect creamy center, it’s important to start with high-quality ingredients like fresh cream, eggs, and butter. Once the filling is made, it’s piped into the Cronut pastry and left to set, creating a deliciously decadent center.
Top Coats: Sweet And Shiny
The top coat of a Cronut is just as important as the filling, providing a sweet and shiny finish that’s sure to impress. Whether you prefer a classic glaze or something a bit more unique like a salted caramel drizzle, the top coat is where you can really get creative with your Cronut recipe. To make a shiny glaze, a mixture of powdered sugar, milk, and flavorings is cooked until thick and then poured over the top of the pastry. Other options for top coats include chocolate ganache, fruit compotes, and even whipped cream.
When it comes to creating the perfect Cronut recipe, the signature fillings and glazes are what take this pastry to the next level. By crafting creamy centers and top coats that are both sweet and shiny, you can create a Cronut that’s truly unforgettable.
Decorative Touches And Presentation
When it comes to creating a truly impressive dessert, the way it is presented can make all the difference. In this section, we will explore some creative ideas for adding decorative touches and elevating the presentation of your homemade cronuts. From garnishes to plating techniques, these tips will help you take your cronuts to the next level.
Elevating With Garnishes
One simple way to enhance the visual appeal of your cronuts is by adding garnishes. These small, decorative elements can add a pop of color, texture, and flavor to your final creation. Consider the following garnish ideas:
- Sprinkle a dusting of powdered sugar or cocoa powder on top of your cronuts for an elegant touch.
- Add a dollop of whipped cream or a scoop of ice cream alongside your cronuts for a creamy and indulgent twist.
- Drizzle a rich chocolate sauce or a fruity coulis over the cronuts for a decadent finishing touch.
- Top each cronut with fresh berries, sliced fruits, or edible flowers to create a visually stunning presentation.
Plating Techniques For Visual Appeal
Aside from garnishes, the way you plate your cronuts can also have a significant impact on their visual appeal. Consider these plating techniques to make your cronuts look more enticing:
- Place the cronuts on a bed of crushed cookies or chocolate crumbs to create a textural contrast.
- Arrange the cronuts in a circular pattern on a plate for an eye-catching presentation.
- Use a piping bag to create decorative patterns with sauces or creams around the plate.
- Pair your cronuts with complementary elements such as fresh fruits, nuts, or a drizzle of caramel sauce.
Remember, presentation plays a crucial role in the overall dining experience. By using these decorative touches and plating techniques, you can transform your cronuts into a visually stunning masterpiece that will impress your guests.
Credit: www.allrecipes.com
Troubleshooting Common Cronut Conundrums
Creating the perfect cronut can be a challenging endeavor, even for seasoned bakers. From avoiding soggy pastry pitfalls to fixing layer separation issues, it’s important to be equipped with the right knowledge to troubleshoot any cronut conundrums that may arise. In this section, we will explore some common problems that bakers encounter when making cronuts and provide simple yet effective solutions to ensure your cronuts turn out flawlessly every time.
Avoiding Soggy Pastry Pitfalls
Soggy cronuts can be a major disappointment, but fear not! By following these tips, you can avoid this common issue:
- Properly measure and mix your ingredients to ensure the dough has the right consistency. Remember, too much moisture can lead to sogginess.
- Allow the cronuts to cool completely on a wire rack before glazing or filling them. This will help prevent excess moisture from accumulating.
- Store your cronuts in an airtight container at room temperature to maintain their crispness. Avoid refrigerating them, as this can contribute to sogginess.
Layer Separation Issues And Fixes
One of the most common problems bakers face when making cronuts is layer separation. But worry not, as here are some solutions to help you overcome this challenge:
- Ensure that you properly laminate the dough by folding and rolling it multiple times. This creates distinct layers that are less likely to separate during baking.
- Chill the dough between each lamination step to keep the butter cold and prevent it from melting into the dough.
- Bake the cronuts at the correct temperature and for the recommended time. Underbaking can result in layer separation, so make sure to follow the recipe closely.
By following these troubleshooting tips, you’ll be well-equipped to overcome any common cronut conundrums that may come your way. With a little practice and attention to detail, you’ll soon master the art of creating delicious and visually stunning cronuts that will impress everyone who takes a bite.
Cronut Variations And Flavors
When it comes to the beloved cronut, the variations and flavors are as diverse as they are delightful. From classic combinations to innovative twists, the world of cronuts offers a tantalizing array of options to satisfy every palate. Whether you’re a fan of seasonal sensations or eager to try out unique renditions of the traditional recipe, there’s a cronut variation for every taste and occasion.
Seasonal Sensations
Embracing the essence of each season, cronut enthusiasts can indulge in a delectable array of seasonal sensations. From refreshing summer fruits to cozy autumn spices, these limited-time offerings bring a burst of seasonal flavors to the beloved pastry. Whether it’s a zesty lemon-infused cronut for summer or a warm, spiced apple creation for fall, these seasonal sensations add a touch of culinary excitement to the cronut experience.
Innovative Twists On The Classic Recipe
Pushing the boundaries of creativity, bakers and pastry chefs continue to dream up innovative twists on the classic cronut recipe. From unconventional fillings to unexpected toppings, these innovative renditions breathe new life into the beloved pastry. Whether it’s a savory-sweet fusion or a daring flavor combination, these innovative cronut variations never fail to surprise and delight adventurous food enthusiasts.
Frequently Asked Questions
Why Does It Take 3 Days To Make A Cronut?
The process of making a Cronut takes 3 days due to the intricate steps involved. The dough needs time to proof and chill, creating a light and flaky texture. The layers are formed through repeated rolling and folding, resulting in a unique pastry.
What Are Cronuts Made Of?
Cronuts are made of croissant dough that is deep-fried, then rolled in sugar and filled with flavored cream. The dough is layered with butter, creating a flaky texture that is similar to a croissant. The creation of the cronut is credited to a New York City pastry chef, Dominique Ansel, in 2013.
Is Cronut Dough The Same As Croissant?
No, Cronut dough is not the same as croissant dough. Cronut is a hybrid pastry made from laminated dough that’s fried, whereas croissants are baked. The dough for Cronut is also enriched with sugar and butter, which makes it different from croissant dough.
Is Cronut Made From Puff Pastry?
Yes, Cronut is made from puff pastry. It is a pastry that combines the flaky layers of a croissant with the shape and deep-fried texture of a doughnut.
Conclusion
This cronut recipe is a delightful treat that combines the best of a croissant and a donut. With its flaky layers and sweet glaze, it is sure to satisfy your cravings. By following these easy steps, you can create your own homemade cronuts that will impress your family and friends.
So why wait? Get in the kitchen and start baking these delicious cronuts today!